Flying Paper Planes
Your child will explore how changing the shape of a paper airplane affects how far the plane flies.
Learning Area(s): Math; Science
MATERIALS
- 2 sheets of the same type of paper
- folding pattern (view or print)
- ruler with centimeters
- masking tape
- tape measure (16 or 25 feet in length)
- scissors
- journal, notebook, or a few sheets of paper stapled together
- something to write with
LET'S PLAY
Click the button to open each section.
You can say, “You will investigate how giving a plane more drag will affect how far it will fly. How do you think changing the shape of a paper plane to give it more drag could change how far the plane flies?” Allow your child to share their prediction and write it in their journal.
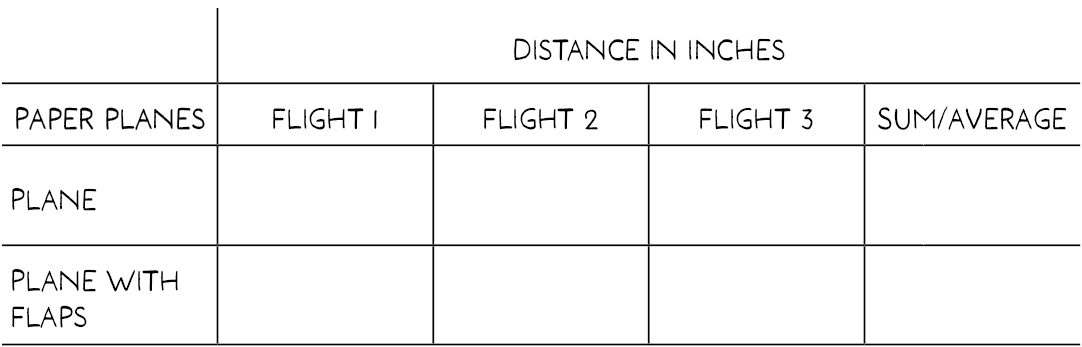
“You can use the paper plane you made to test how far it flies now and how far it flies after you change its shape. You will throw the plane you made 3 times. You will write down how many inches the plane flies before and after the shape change. A good way to organize how far the plane flies each time is with a data table made up of columns and rows. Data means information. The information or data for your table is the distances the plane flies. Tables can be helpful when we want to compare data.”
Find or make a journal and have your child use the ruler to draw a data table like the example that follows. If your child is in 2nd or 3rd grade,they should write “sum” in the last column; if your child is in 4th or 5th grade, they should write “average.”
“Now, you are ready to test your plane.”
- Have your child stand behind the starting line. Your child should try to fly the plane in the same way by standing the same and using the same amount of force. Allow them to make a few practice flights to decide how they will throw.
- Flights 1-3: Ask your child to throw the plane and record how far it flies by lining the plane up with the tape measure. Have them record the distance in inches in the data table space for plane: flight 1. Repeat for flight 2 and flight 3.
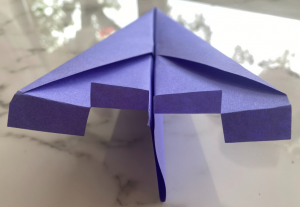
- Change the shape of the plane: Ask your child to cut two slits into the center of each wing’s back edge and two slits into the fold lines at the center of each wing’s back edge. Each slit should be about 1 centimeter long. You now have four flaps that should each be about 2 centimeters wide. Fold the center flaps up to 90 degrees. Fold the outer flaps down to 90 degrees. See the picture.
4. Flights 1-3 with flaps/drag: Repeat the same steps from flights 1-3.
If your child is in 2nd or 3rd grade: Ask them to add up the plane’s flights and write the total in the appropriate space in the data table.
If your child is in 4th or 5th grade: Ask them to average the plane’s flights by adding the distances and dividing by 3. Have them write the average in the appropriate space in the data table.
TIPS
- To extend this activity, have your child
- add one or more paper clips to the planes to see if added weight changes how far it flies
- try the activity with different types of paper airplanes
- To learn more about the concepts of aerodynamics, review these additional resources:
- Books:
- Let’s Fly a Plane: Launching into the Science of Flight with Aerospace Engineering by Chris Ferrie
- Give It a Push! Give It a Pull!: A Look at Forces by Jenifer Boothroyd
- Websites:
- NASA: What Is Aerodynamics?
- National Air and Space Museum: The Four Forces
- Video:
- PBS LearningMedia: Flight
- Books:
